Design Manager is one of the new feature introduced in SharePoint 2013. Using Design Manager, the Branding and Customization can be done very easily in SharePoint 2013. Design Manager only available on publishing site template and the other default templates does not have this feature. Design Manager has a lot of features. In this post I tried to give a broad idea about Design Manager by converting HTML file to Master page.
Before diving into design manager, First we need to create wireframe in HTML. The wireframe needs to contain HTML, CSS, images and other support files.
I have provided the sample files.
The following is a sample HTML wireframe source and structure.
Structure

Source
1) HTMLPage
<html> <head> <title>My Blogs</title> <link href="css/profile.css" rel="stylesheet" /> </head> <body> <div class="page_layout"> <div class="profilepicture"> <img class="imgsize" src="images/Profile.JPG" /> </div> <div class="blogtitle"> Create Master Page using design manager in SharePoint 2013 </div> <div class="pervioustitle"> <ul class="bloglist"> <li>Previous Blog one</li> <li>Previous Blog two</li> <li>Previous Blog three</li> <li>Previous Blog four</li> </ul> </div> <div class="blogcontent"> sample bolg content sample bolg content sample bolg content sample bolg content sample bolg content sample bolg content sample bolg content sample bolg content sample bolg content sample bolg content sample bolg content sample bolg content sample bolg content sample bolg content sample bolg content sample bolg content sample bolg content sample bolg content sample bolg content sample bolg content sample bolg content sample bolg content <img src="images/DesignManager.JPG" /> </div> </div> </body> </html>
2) CSSbody { font-family: Calibri; width: 98%; } div { word-wrap: break-word; } .page_layout { padding: 10px 0px 0px 0px; } .profilepicture { float: left; width: 20%; height: 200px; position: fixed; } .imgsize { width:100%; height:100% } .blogtitle { width: 78%; float: right; font-size: x-large; font-weight: bold; color: #0000FF; text-decoration:underline; } .pervioustitle { width: 20%; padding: 200px 10px 0px 0px; float: left; position: fixed; } ul.bloglist { list-style-type: circle; font-size: medium; font-weight: bold; font-style: italic; color: #000066; } .blogcontent { float: right; width: 78%; padding: 20px 5px 0px 5px; top: 20px; }
HTML Page View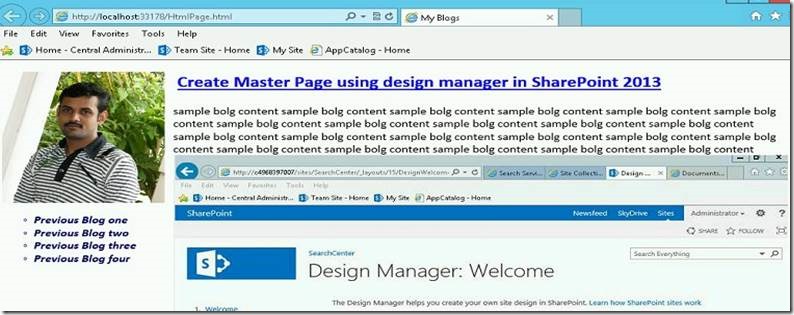
The following is a step by step procedure for creating master page using design manager.
Step 1:
Create new publish portal site collection

Step 2:
Open the site then click design manager link from right top corner "Settings" menu.

Step 3:
Click the upload design files for “Map the following location as a network drive so you can work easily with your design files: “

Click the URL and it will provide the network path then map the network drive

If you face the following error.
Then add the “Desktop Experience” feature to your server using Server Manager.

Once the feature activated then maps the network drive.
Step 4:
Open the source drive (HTML Wireframe path) and copy all the supported files then paste to destination drive (mapped path).

Step 5:
Again open the design manger then click Edit Master Pages and click “Convert HTML file to SharePoint Master Page”

Step 6:
It will open a pop up window then select the htmlpage (which you have uploaded) then click insert

Automatically converted from HTML to SharePoint Master Page. The approval status is DRAFT.

Step 7:
Once the conversion is completed click the Htmlpage.html check the preview and see the master page then back to the design manager and publish the page.


Step 8:
After publishing the page click setting menu and select “Site setting” link

Step 9:
Click Master Page link and select the HTMLPage in site master page category drop down menu then click ok button.


Step 10:
Click the home page the Htmlpage converted to SharePoint Master Page with default menus.

In next article, let us see the code snippet and create design manager master page package.
Happy Coding.
SanthoshBabu ManickaMohan


No comments:
Post a Comment